Showing posts with label jsf2. Show all posts

Tuesday, December 21, 2010

JSF2.0 component for cross-field validation


Have you ever had problems with cross-field validation in JSF? Me too, so I created this component. You can validate few UIInput components and have their values as List in validator. The component is in softwaremill-faces library. To use it in maven project, add repository:

<repository>
  <url>http://tools.softwaremill.pl/nexus/content/groups/smlcommon-repos/ </url>
  <layout>default</layout>
  <releases>
    <enabled>true</enabled>
  </releases>
  <snapshots>
    <enabled>true</enabled>
  </snapshots>
</repository>
and dependency:
<dependency>
  <groupId>pl.softwaremill.common</groupId>
  <artifactId>softwaremill-faces</artifactId>
  <version>43-SNAPSHOT</version>
</dependency>
Now you can use multiValidator component. First add namespace to your .xhtml page:
xmlns:v="http://pl.softwaremill.common.faces/components"

Then just wrap components you want to cross-validate in <v:multiValidator>. If you attach validator to this component, value parameter that goes to validation method is List of values of UIInput components inside  tag.

E.g. if you want to validate two checkboxes. Each can be checked or unchecked, but at least one has to be checked.
<v:multiValidator id="multi" validator="#{bean.validationMethod}">
  <h:selectBooleanCheckbox value="#{bean.check1}" />
  <h:selectBooleanCheckbox value="#{bean.check2}" />
</v:multiValidator>
<h:message for="multi" />
Validation method in bean:
public void validationMethod(FacesContext context, UIComponent component, Object value) {
  List<Object> values = (List<Object>) value;
  //value is list of values of both selectBooleanCheckboxes
  Boolean firstChecked = (Boolean) values.get(0);
  Boolean secondChecked = (Boolean) values.get(1);

  if (! (firstChecked || secondChecked)) {
    Message message = new FacesMessage(FacesMessage.SEVERITY_ERROR, "Check at least one checkbox", null);
    throw new ValidatorException(message);
  }
}
If none checkbox is checked error message is displayed in <h:message for="multi"> tag.

Source code of this component is on github.

Any suggestions, opinions or questions regarding this component are welcome. Have a good time using it :)

Sunday, September 26, 2010

Flash scope in JSF 2.0 (nothing about Adobe Flash)

In JSF 2.0, amongst Request, Session etc, there is the new scope called Flash. (However there is no annotation @FlashScope, and you can't put bean in this scope). It's concept is taken from Ruby on Rails. Data in Flash scope are available for current and for next request, but not for subsequent requests. Usage is very simple.
On first page (e.g. index.html):
<h:form>
  <h:inputtext value="#{flash.text}">
  <h:commandbutton action="page?faces-redirect=true" value="To page">
</h:form>
And this is the page we are redirecting to, page.xhtml:
<h:form>
  <h:outputtext value="#{flash.text}">
</h:form>
Why would you need such scope? Imagine you want to enter data on one page, then redirect to another page, and display this data. If not for redirect, we could use Request scope. But with redirect value is sent with request, then browser is redirected to another page, and makes another request. Request scoped value is gone. In such case Flash scope becomes useful. We can put value in this scope with one request, and when another request is made, the value is still there. But it is not stored in session, and is not available for subsequent requests.

However, there is a way to make data in Flash scope alive a bit longer. It is enough if in page.xhtml we change #{flash.text} to #{flash.keep.text}. This way data is not removed from the scope after first request, but is available for one more.

In managed beans, you can get flash scope by
Flash flash = FacesContext.getCurrentInstance().getExternalContext().getFlash();

Saturday, August 28, 2010

JSF 2 templating

In this post I want to share my knowledge about JSF 2 templating. Most of this post are source codes, but if you are novice and don't know how to start, and where to put the source code, here you go.

0. Download Netbeans and setup the project.

Install Netbeans and run it. I use version 6.9. In Netbeans, go to File -> New Project... and then choose Java Web and Web Application. Click Next.


In next window choose project name, optionally directory where to store it, and set the project as the main project.


In the next window leave <None> in enterprise application and choose web server. Default should be ok, the same about context path.


Check JavaServer Faces. In Libraries tab select Registered Libraries and JSF 2.0.

1. Simple template and it's client. <ui:insert> and <ui:define>

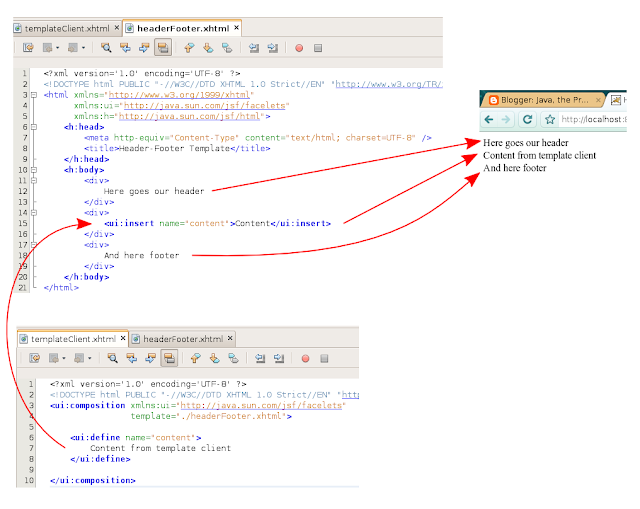
Ok, we'll create simpliest template possible. In Web Pages create new .xhtml file, let's name it headerFooter.xhtml. It's our template containing header, footer, and place for some content between them.


You can let Netbeans create it for you along with nice CSS files, you can also select one of predefined template layouts. Click File ->  New File -> JavaServer Faces -> Facelets Template. Our template code:
<?xml version='1.0' encoding='UTF-8' ?>
<!DOCTYPE html PUBLIC "-//W3C//DTD XHTML 1.0 Strict//EN" "http://www.w3.org/TR/xhtml1/DTD/xhtml1-strict.dtd">
<html xmlns="http://www.w3.org/1999/xhtml"
      xmlns:ui="http://java.sun.com/jsf/facelets"
      xmlns:h="http://java.sun.com/jsf/html">
    <h:head>
        <meta http-equiv="Content-Type" content="text/html; charset=UTF-8" />
        <title>Header-Footer Template</title>
    </h:head>
    <h:body>
        <div id="top">
            Here goes our header
        </div>
        <div id="content" class="center_content">
            <ui:insert name="content">Content</ui:insert>
        </div>
        <div id="bottom">
            And here footer
        </div>
    </h:body>
</html>
Now create template client. It is a page which uses the template. Let's call it templateClient.xhtml:
<?xml version='1.0' encoding='UTF-8' ?>
<!DOCTYPE html PUBLIC "-//W3C//DTD XHTML 1.0 Strict//EN" "http://www.w3.org/TR/xhtml1/DTD/xhtml1-strict.dtd">
<ui:composition xmlns:ui="http://java.sun.com/jsf/facelets"
                template="./headerFooter.xhtml">
    
    <ui:define name="content">
        content
    </ui:define>

</ui:composition>
In template there is <ui:insert> tag. This is a named place where content from template client goes, and it's name in this case is content. In client, there is <ui:composition>. It uses template given as tags attribute, and has <ui:define> tags, with the same name as <ui:insert> in template. So what's in <ui:define> tag is inserted in place of <ui:insert> with the same name. You can run your project (in Netbeans right-click on project and select Run) and see the templated page at http://localhost:8080/JsfTemplating/faces/templateClient.xhtml Any content surrounding <ui:composition> tag is ommitted.

Template client can also be a template. Just put some <ui:insert> tag inside of <ui:define> block. E.g.
<ui:define name="content">
    <div class="info">
        Here goes some additional info, which is not in the header nor in the footer, but we need it on some pages.
    </div>
    <ui:insert name="innerContent">
</ui:define>

2. Decorate

We can also insert parts of markup in our pages. If you have piece of code which you put on some pages and it's always the same, you can separate it to a file and just insert it in the pages. <ui:decorate> tag is used for this:
<?xml version='1.0' encoding='UTF-8' ?>
<!DOCTYPE html PUBLIC "-//W3C//DTD XHTML 1.0 Strict//EN" "http://www.w3.org/TR/xhtml1/DTD/xhtml1-strict.dtd">
<html xmlns="http://www.w3.org/1999/xhtml"
      xmlns:ui="http://java.sun.com/jsf/facelets">
    <body>
        Some page text
        <ui:decorate template="./disclaimer.xhtml"/>
    </body>
</html>
Content of disclaimer.xhtml is injected where <ui:decorate> tag is. Don't add <?xml ... ?> declaration or doctype there, or it is going to be inserted in the middle of your page, which is not desirable. You can also use standard templating in disclaimer.xhtml. You can put <ui:insert> there and <ui:define> in page which uses it.

3. Include

Another method to attach some piece of markup is <ui:include>. This one also lets us pass some parameter to the piece of code we want to include, and this parameter can be managed bean. Lets say we have bean with information about some documents:
@ManagedBean
public class Paper {

    private String author;
    private String title;

    //getters and setters omitted
}
Piece of code to display information about a book is prepared in book.xhtml file:
<div xmlns="http://www.w3.org/1999/xhtml">
    Book "#{book.title}" by #{book.author}
</div>
Now in any other JSF page we can use it:
<ui:include src="./book.xhtml">
    <ui:param name="book" value="#{tomSawyer}" />
</ui:include>
I hope this post is going to be helpful to somebody. At least to me. Happy templating with JSF!

Tuesday, March 2, 2010

Simple AJAX with JSF 2.0

In JSF 2.0, there are tags added to make AJAX calls easy. Without further ado:

<?xml version='1.0' encoding='UTF-8' ?>
<!DOCTYPE html PUBLIC "-//W3C//DTD XHTML 1.0 Transitional//EN" "http://www.w3.org/TR/xhtml1/DTD/xhtml1-transitional.dtd">
<html xmlns="http://www.w3.org/1999/xhtml"
 xmlns:ui="http://java.sun.com/jsf/facelets"
 xmlns:h="http://java.sun.com/jsf/html"
 xmlns:f="http://java.sun.com/jsf/core">
<h:head>
   <h:outputScript name="jsf.js" library="javax.faces" target="body"></h:outputScript>
   <title>Ajax</title>
</h:head>
<h:body>
   <f:view contentType="text/html; charset=UTF-8">
       <h1>Hello Ajax World!</h1>
       <h:form id="form">
           <h:inputText id="name" value="#{nameMBean.name}"/>

           <h:commandButton value="Reverse name via Ajax!">
               <f:ajax execute="name" render="reverseName"/>
           </h:commandButton>
           <h:outputText id="reverseName" value="#{nameMBean.reverseName}"/>
       </h:form>
   </f:view>
</h:body>
</html>

First things first. To use AJAX in JSF 2.0, we have to attach jsf.js file (line 8). Then we are ready.

Most interesting is line 18. <f:ajax> added to command button makes AJAX action fire when button is pressed. We could as well put it into <h:inputText> element, then it would fire on change of text inside (onchange event).

Parameter execute tells JSF which parts it should send to server for model update. This could be also form, for all the parameters in the form, or list of element ids separated by space. Parameter render denotes which parts of view should be rerendered after receiving AJAX response. Here we can also put more than one.

We can put more parameters to <f:ajax>, like event, where we can specify on which event AJAX action should occur (not necessarly click event), or listener, where we can call some method on managed bean.