Friday, March 20, 2015

Browse H2 in-memory database in tests

If you sometimes want to look into H2 tables during the test, there is a problem, because by default in-memory H2 database is accessible only from the process where it was created. Simple way to browse the data looks like this:

Server.createWebServer().start()

It starts the web server on port 8082, so you can connect there, enter DB url, username and password (usually username and password are empty, you don’t need to protect your in-memory test database, do you?) and voila! You can browse the data.

Just remember to put some breakpoint in the test code, because after the test the process is finished, and so is the server. Another thing to remember is to set the breakpoint to stop only current thread, not all threads (like it is by default in Idea), because if you stop all of them, the server one is also stopped :)

Written with StackEdit.

Thursday, August 14, 2014

Git reset soft/mixed/hard

What is the difference between git reset soft, mixed and hard? When doing reset in git, you can add --soft, --mixed or --hard switch, or leave it, --mixed is the default. What do this switches do?

  1. Code before changes
  2. Code after changes
  3. Changes staged on index
  4. Changes commited

Now if you issue

git reset --xxxx HEAD~1

--soft moves you back to (3), --mixed to (2) and --hard to (1)

Written with StackEdit.

Friday, July 11, 2014

Develop, test and deploy standalone apps on CloudBees

CloudBees is a cloud platform providing repository, CI service (Jenkins) and server for your apps. So everything you need to develop, test and deploy. There are many options, e.g. repository can be Git or SVN, for server you can choose Jetty, Tomcat, Glassfish, JBoss, Wildfly etc. It is also possible to run standalone applications, which are provided with port number, so you can start your own server. And that’s the case we’ll cover here.

spray.io is Scala framework for web apps. It allows you to create standalone web-apps (starting their own server, spray-can) or somewhat limited .war ones (spray-servlet), which you can deploy on JEE server like Glassfish, JBoss etc. We are going to use standalone here.

You can clone the app from github Let’s take a quick look at it now.

The app

Boot

The Boot file is Scala App, so it’s like java class with main method. It’s runnable. It creates Service actor, which is handling all the HTTP requests. It also reads port number from app.port system property and binds the service to the host and port. app.port is provided by CloudBees, if you want to run the app locally, you need to set it e.g. by jvm command line -Dapp.port=8080.

Service

Service has MyService trait, which handles routing to empty path only. Yes, the app is not very complicated ;)

Buildfile

build.gradle file is a bit more interesting. Let’s start from it’s end.

  • mainClassName attribute is set to Scala App. This is the class that is going to be run when you run it locally from command line by gradlew run.
  • applicationDefaultJvmArgs is set to -Dapp.port=8080 and it’s also necessery for running locally from gradle. This way we set port which Service is going to be bound to.
  • jar.archiveName is a setting used to set generated .jar name. Without it it’s dependent on the project directory name.

You can run the application by issuing gradlew run (make sure gradlew file is executable). When it’s running, you can point your browser to http://localhost:8080 and you should see “Say hello to spray-routing on spray-can!” Nothing fancy, sorry.

There is also “cb” task definde for gradle. If you issue gradlew cb, it builds zip file, with all the dependency .jars, and szjug-sprayapp-1.0.jar in it’s root. This layout is necessary for CloudBees stand alone apps.

Deploy to CloudBees

First you need to create an account on CloudBees. If you have one, download CloudBees SDK - so you can run commands from your command line. On Mac, I prefer brew install, but you are free to choose your way.

When installed, run bees command. When run for the first time, it asks your login/password, so you don’t need to provide it every time you want to use bees.

Build .zip we’ll deploy to the cloud. Go into the app directory (szjug-sprayapp) and issue gradlew cb command. This command not only creates the .zip file, it also prints .jars list useful to pass to bees command as classpath.

Deploy the application with the following command run from szjug-sprayapp directory:

bees app:deploy -a spray-can -t java -R class=pl.szjug.sprayapp.Boot -R classpath=spray-can-1.3.1.jar:spray-routing-1.3.1.jar:spray-testkit-1.3.1.jar:akka-actor_2.10-2.3.2.jar:spray-io-1.3.1.jar:spray-http-1.3.1.jar:spray-util-1.3.1.jar:scala-library-2.10.3.jar:spray-httpx-1.3.1.jar:shapeless_2.10-1.2.4.jar:akka-testkit_2.10-2.3.0.jar:config-1.2.0.jar:parboiled-scala_2.10-1.1.6.jar:mimepull-1.9.4.jar:parboiled-core-1.1.6.jar:szjug-sprayapp-1.0.jar build/distributions/szjug-sprayapp-1.0.zip

And here abbreviated version for readability:

bees app:deploy -a spray-can -t java -R class=pl.szjug.sprayapp.Boot -R classpath=...:szjug-sprayapp-1.0.jar build/distributions/szjug-sprayapp-1.0.zip

spray-can is an application name, -t java is application type. -R are CloudBees properties, like class to run and classpath to use. Files for classpath are helpfully printed when gradle runs cb task, so you just need to copy & paste.

And that’s it! Our application is running on the CloudBees server. It’s accessible at the URL from CloudBees console.
enter image description here

Use CloudBees services

The app is deployed on CloudBees, but is that all? As I mentioned we could also use git repository and Jenkins. Let’s do it now.

Repository (Git)

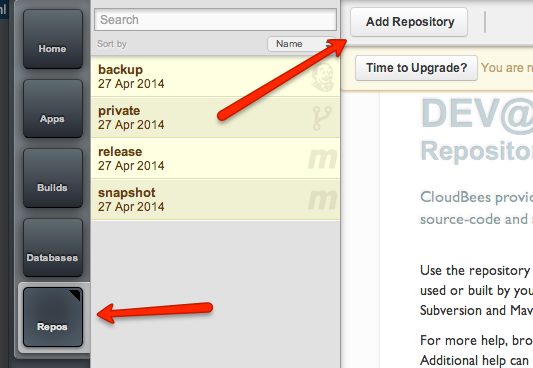
Create new git repository on your CloudBees account. Choose “Repos” on the left, “Add Repository”… it’s all pretty straightforward.
enter image description here

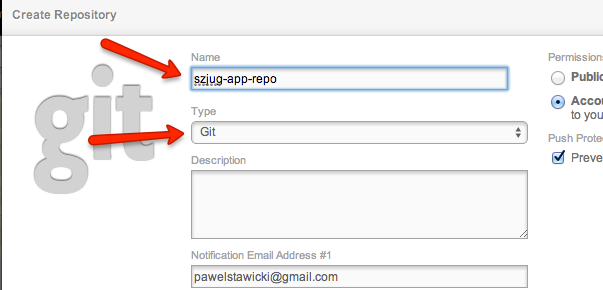
Name it “szjug-app-repo” and remember it should be Git.
enter image description here

Next add this repository as remote one to your local git repo. On the repositories page on your CloudBees console there is very helpful cheetsheet about how to do it.

First add git remote repository. Let’s name it cb

git remote add cb ssh://git@git.cloudbees.com/pawelstawicki/szjug-app-repo.git

Then push your commits there:

git push cb master

Now you have your code on CloudBees.

CI build server (Jenkins)

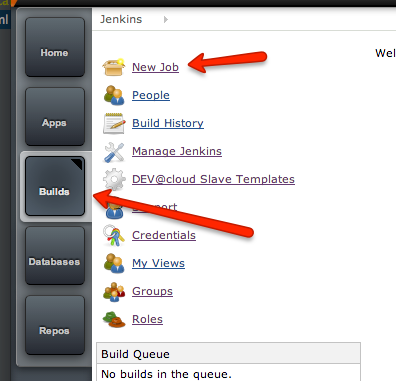
It’s time to configure the app build on CI server. Go to “Builds”. This is where Jenkins lives. Create new “free-style” job.

enter image description here

enter image description here

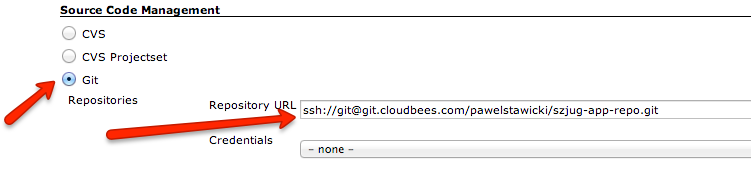
Set your git repository to the job, so that Jenkins checks out always fresh code version. You’ll need the repository URL. You can take it from “Repos” page.

enter image description here

Set the URL here:

enter image description here

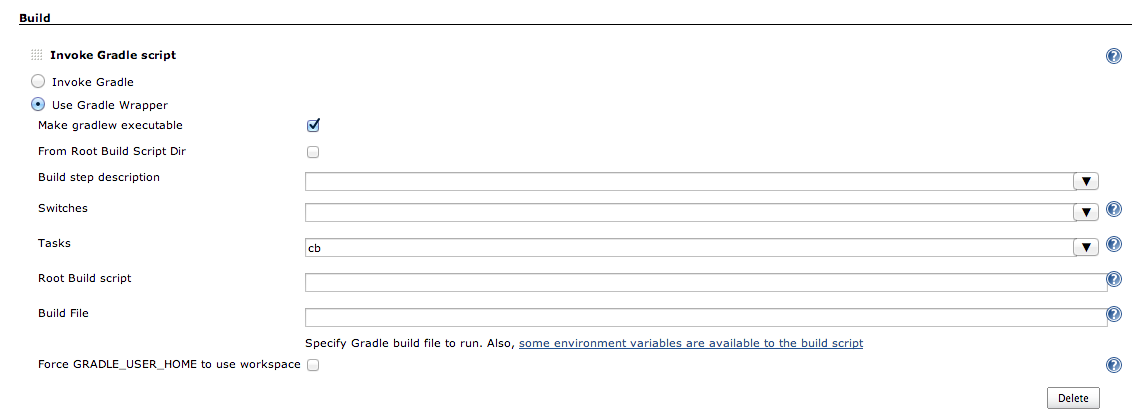
Next thing to set up is gradle task. Add next build step of type “Invoke gradle script”. Select “Use Gradle Wrapper” - this way you can use gradle version provided with the project. Set “cb” as the gradle task to run.
enter image description here

Well, that’s all you need to have the app built. But we want to deploy it, don’t we? Add post-build action “Deploy applications”. Enter Application ID (spray-can in our case, region should change automatically). This way we tell Jenkins where to deploy. It also needs to know what to deploy. Enter build/distributions/szjug-app-job-*.zip as “Application file”.

enter image description here

Because you deployed the application earlier from the command line, settings like application type, main class, classpath etc. are already there and you don’t need to provide it again.

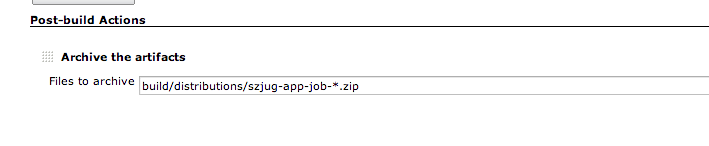
It might also be useful to keep the zip file from each build, so we can archive it. Just add post-build action “Archive the artifacts” and set the same zip file.
enter image description here

Ok, that’s all for build configuration on Jenkins. Now you can hit “Build now” link and the build should be added to the queue. When it is finished, you can see the logs, status etc. But what’s more important, the application should be deployed and accessible to the whole world. You can now change something in it, hit “Build now” and after it’s finished, check if the changes are applied.

Tests

Probably you also noticed there is a test attached. You can run it by gradlew test. It’s specs2 test, with trait MyService so we have access to myRoute, and Specs2RouteTest so we have access to spray.io testing facilities.

@RunWith(classOf[JUnitRunner]) is necessary to run tests in gradle.

Now when we have tests, we’d like to see tests results. That’s another post-build step in Jenkins. Press “Add post-build action” -> “Publish JUnit test result report”.

Gradle doesn’t put test results where maven does, so you’ll need to specify the location of report files.

enter image description here

When it’s done, next build should show test results.

Trigger build job

You now have build job able to build, test and deploy the application. However, this build is going to run only when you run it by hand. Let’s make it run every day, and after every change pushed to the repository.

enter image description here

Summary

So now you have everything necessary to develop an app. Git repository, continous integration build system, and infrastructure to deploy the app to (actually, also continously).

Think of your own app, and… happy devopsing ;)

Sunday, May 25, 2014

Validation of parameter passed to mock call in Spock

If you use Spock, sometimes you want to check mock method call. You can of course do it like this:
Problem here is that when the parameter passed to the method is wrong, you won't know what is wrong with it:
Too few invocations for:

1 * service.method({
            it.firstname == "Peter" && it.surname == "Stawicki"
        })   (0 invocations)

Unmatched invocations (ordered by similarity):

1 * service.method(eu.vegasoft.spocktest.validateparam.Person@40f892a4)
Sometimes we want to validate also parameter passed to the mock method. We can do it like this:
Now when the passed parameter does not match, we can see exactly what was wrong with it:
Condition not satisfied:

p.firstname == "Peter"
| |         |
| Paweł     false
|           3 differences (40% similarity)
|           P(aw)e(ł)
|           P(et)e(r)
eu.vegasoft.spocktest.validateparam.Person@34b23d12

Thursday, April 24, 2014

Do not underestimate the power of the fun

Do you like your tools?

Are you working with the technology, programming language and tools that you like? Are you having fun working with it?

When a new project starts, the company has to decide what technologies, frameworks and tools will be used to develop it. Most common sense factor to take into consideration is the tool's ability to get the job done. However, especially in Java world, usually there is more than one tool  able to pass this test. Well, usually there are tens, if not hundreds of them. So another factors have to be used.

The next important and also quite obvious one is how easy the tool is to use, and how fast can we get the job done with it. "Easy" is subjective, and "fast" depends strongly on the tool itself and the environment it is used in. Like the tool's learning curve or the developers knowledge of it.

While the developers knowledge of the tool usually is taken into account, their desire to work with it (or not), usually is not. Here I would like to convince you that it is really important too.

Known != best

There are cases where it's better to choose cool tools instead of known ones. Yes, the developers need to learn it, and it obviously costs some time, but I believe it is an investment that pays off later. Especially if alternatives are the ones that the devs are experienced with, but don't want to use any more. Probably there are some people who like to code in the same language and use the same frameworks for 10 years, but I don't know many of them. Most of the coders I know like to learn new languages, use new frameworks, tools and libs. Sadly, some of them can't do it because of corporate policies, customer's requirements or other restrictions.

Why do I believe such an investment pays off? If you think developer writes 800 LOC/day, so 100 LOC/hour, so 10 LOC/minute... well, you're wrong. Developers are not machines working with constant speed 9 to 5. Sometimes we are "in the zone", coding like crazy (let's leave the code quality aside), sometimes we are creative, working with pen and paper, inventing clever solutions, algorithms etc. and sometimes we are just bored, forcing ourselves to put 15th form on the page or write boilerplate code.


The power of fun

Now ask yourself, in which situation you (or your developers) usually find themselves? And if you are often bored, working 5th year with the same technology and tools, think about the times when you were learning it. Remember when you were using it for the first time? Were you bored then? Or rather excited? Were you less productive? That's truism, but we are not productive when we need to force ourselves to work. Maybe it's a good idea to change your work to be more fun? Use some tools you don't know (yet), but really want to try? It might seem you are going to be less productive, at least at the beginning, but is it really true? Moreover, if it allows you to write less boilerplate code or closures or anything else that can make you faster and more efficient in the long run, it seems a really good investment.

There is one more advantage of cool and fun tools. If you are a company owner, do you want your business partners to consider your company expensive but very good, delivering high quality services and worth the price, or not-so-good but cheap? I don't know any software company that wants the latter. We all want to be good - and earn more, but well deserved, money. Now think about good and best developers - where do they go? Do they choose companies where they have to work with old, boring tools and frameworks? Even when you pay them much, the best devs are not motivated by the money. Probably you know it already. Good devs are the ones that like to learn and discover new stuff. There is no better way to learn new stuff other then working with it. And there are not many things that are as fun for a geek as working with languages, technologies and tools they like.


So, when choosing tools for your next project, take fun factor into account. Or even better - let the developers make the choice.

--
This presentation might be interesting: http://www.infoq.com/presentations/Scala-Guardian It's Graham Tackley story about how they introduced Scala in Guardian, and what happened then.

Cool image courtesy of Łukasz Żuchowski http://blog.zuchos.com

Tuesday, January 22, 2013

Spock testing framework

Some time ago I gave presentation about Spock on Szczecin JUG. Later I gave this presentation also on my company SoftwareMill meeting. 

I think it's high time to share it on my blog too: http://amorfis.github.com/spock-pres/ (navigate with arrow keys).

Friday, November 2, 2012

FEST Assertions for Joda Time

Do you write unit tests? Of course you do. Do you use Joda Time? I think so. Do you use FEST Assertions? You should try it if you haven't yet. With FEST Assertions we can write fluent code like this:
assertThat(result).isEqualTo(expected);
assertThat(testRunSeconds).isLessThan(maxTestRunSeconds);
assertThat(someList).isNotNull().hasSize(3).contains("expectedEntry");
Now let's assume we have some functions that return joda DateTime, and we want to test it. Can we do this in FEST Assertions?
assertThat(resultDateTime).isAfter(timeframeBeginning).isBefore(timeframeEnd);
No, we can't :( FEST Assertions don't handle Joda Time classes. However, do not worry :) At SoftwareMill we have written our own TimeAssertions for that :) So you can write your code like this:
TimeAssertions.assertTime(someTime).isAfterOrAt(someOtherTime);
TimeAssertions works for org.joda.time.DateTime, java.util.Date and org.joda.time.LocalDateTime. You can freely exchange DateTime and Date, i.e. you can compare DateTime to Date, DateTime to DateTime etc. LocalDateTime can be compared only to instances of the same class, as it doesn't make sense to compare it to DateTime or Date without specifying the time zone. TimeAssertions is available on github. If you want to use it from Maven project, add repository:
<repository>
    <id>softwaremill-releases</id>
    <name>SoftwareMill Releases</name>
    <url>http://tools.softwaremill.pl/nexus/content/repositories/releases</url>
</repository>
And dependency:
<dependency>
    <groupId>pl.softwaremill.common</groupId>
    <artifactId>softwaremill-test-util</artifactId>
    <version>70</version>
</dependency>
Happy testing!

Wednesday, September 26, 2012

Get script's own directory in bash script

It was always a problem for me to get the directory the called script is stored in, in the script itself. Thanks to this SO question (http://stackoverflow.com/questions/59895/can-a-bash-script-tell-what-directory-its-stored-in) it's not a problem anymore. As it says:
DIR="$( cd "$( dirname "${BASH_SOURCE[0]}" )" && pwd )"
Or, to get the dereferenced path (all directory symlinks resolved), do this:
DIR="$( cd -P "$( dirname "${BASH_SOURCE[0]}" )" && pwd )"

Saturday, September 15, 2012

Get specific PC IP from "arp -a"

I want to extract IP of machine leonidas. arp -a returns such line (among others): 
leonidas.home (192.168.1.5) at 0:1c:c0:de:8f:28 on en1 ifscope [ethernet] 

To have only IP:
arp -a | grep leonidas | cut -f 2 -d ' ' | sed 's/[()]//g'
prints
192.168.1.5

Monday, January 9, 2012

My encounter with a small bug in Hibernate

The problem

At work, I needed to use entities with @DiscriminatorColumn inheritance. It means all types are kept in the same table, with value in this column showing what type given row is of. It's not recommended way to handle inheritance, but for some reasons we needed to use it. In developement, locally, I was using PostgreSQL database. When I tried to store this entities, I was receiving strange errors. Saying I cannot store an entity because entity with such id is already in database. It was quite strange, I was trying to store vanilla new entity. Test case to show this error is very short, so I'll include it here:
//Parent entity
@Entity
@Inheritance(strategy = SINGLE_TABLE)
@DiscriminatorColumn(name = "CLASS_ID", discriminatorType = INTEGER)
public abstract class ParentEntity {
  @Id
  @GeneratedValue(strategy = IDENTITY)
  private Long id;
}

//Child entity with discriminator  
@Entity
@DiscriminatorValue("1")
public class InheritingEntity extends ParentEntity {
}

//Test
public class PersistChildEntitiesWithDiscriminatorTest extends BaseCoreFunctionalTestCase {
  
  @Test
  public void shouldPersistTwoEntities() {
    Session session = openSession();
    session.beginTransaction();
    InheritingEntity child1 = new InheritingEntity();
    InheritingEntity child2 = new InheritingEntity();
    session.save(child1);
    session.save(child2);
    session.getTransaction().rollback();
  }
}

The cause

This test throws exception on second save, but only on PostgreSQL. Why is that? Well, when you save new entity to persistence context, Hibernate issues SQL call to database instantly. Other queries, like updates, are cached, and sent to database on em.flush or em.commit. But inserting of new entities is not cached and there is a reason for that. When we save new entity, Hibernate needs to assign ID to it, and this is taken from database. Most databases return ResultSet with one row and one column after insert, and it contains newly assigned ID. However, PostgreSQL behaves a bit differently. It returns whole inserted row (of course, with ID filled in). In most cases it works, because ID is the first column in this row, so when Hibernate takes value from the first row and the first column, it is the correct one. However, in case of classes with discriminator, ID is not the first column. Discriminator is the first column. So first insert is correct, ID 1 is assigned to child1, but then when we try to store child2, Hibernate also tries to assign 1 to it's ID, and complaints that there already is another entity with it.

The solution

So there was a bug in Hibernate. Can I solve it? I asked this question to myself, but to answer I couldn't do anything else than try ;) So I forked hibernate repository (yes, it's on github!) and... I was quite overwhelmed by the mass of code there. First challenge was to try to open it in my IDE, with all the subprojects and their interdependencies configured correctly. Thankfully there is gradle task for creating project files for IntelliJ IDEA, the IDE I'm happy user of. Next task was configuring Hibernate tests to use my PostgreSQL database. It turned out quite easy after one or two emails on hibernate-dev list. Now I had to change the code assigning IDs to entities to take it not always from first column first row, but sometimes from column of given name. So I had to get the name of column keeping IDs, which I did with a little help from other developers on the dev list.

The contribution

Now I commited fix to my forked repository on github, issued a pull request, got some comments, fixed files formatting... We'll see if it's accepted. UPDATE: It is accepted :)

Wednesday, December 28, 2011

Easy way to convert file encoding

Easy way to convert text files to UTF-8 on Ubuntu. Install package enca and you are able to:
enconv -L pl -x UTF-8 myfile.txt
Where after -L is language specified (necessary for enca to recognize file encoding before conversion) and after -x destination encoding.
Warning: enconv overwrites existing file, so better create backup copy before.


UPDATE: Another way, useful if you know source file encoding:
iconv -f ISO-8859-2 -t UTF-8 source.txt > utf8.txt

Wednesday, November 30, 2011

Play! with Heroku

Recently, inspired by some talks on Devoxx, I decided to check Play framework and Heroku.

Play is another java web framework, but this one is heavily influenced by Ruby on Rails. Convention over configuration, little code necessary etc. Looks like Play is gaining momentum, version 2 (now beta) supports Scala and now it became part of Typesafe stack.

Heroku is another cloud. Well, quite different than AWS or GAE (actually, as far as I know, it works on AWS). Heroku is not only running applications, it is also able to build and deploy them. So to deploy your changes, it's enough to make git push.

So first, download Play 2 beta from this site. Unpack, add dir to your $PATH, so that you could use play command from anywhere.

Go to dir where you want to create the app and issue play new helloapp (where helloapp is your app name). Play should create helloapp directory. No go into it. You can notice that Play nicely added .gitignore file there, so when you create git repository here, unnecessary files won't be added. Play created fully functional, basic web application. You can issue play run in helloapp directory and the server is going to be started and application deployed. You can now see it on localhost:9000.

Now you'll need account on Heroku. Create one on heroku.com, it's easy as creating email or forum account. Then just activate it by email sent to you from Heroku.

For your app to be able to run on Heroku cloud, you'll need to add one more file. In the helloapp dir create Procfile file with content like this:
web: target/start
If you created your app with Play 1.x instead of 2.0, Procfile should be quite different:
web: play run --http.port=$PORT $PLAY_OPTS

To interact with the cloud you'll also need heroku-toolbelt. Get one from here.

Ok, you have your app and all the tools necessary to deploy it to the cloud. You'll also need git, which I assume you have already installed ;) As I mentioned on the beginning, it's necessary to push your app's code to Heroku.

Create git repository in the helloapp directory. Enter the directory and issue the following comands.
git init
git add .
git commit -m init

This commands created git repository in the directory, added current directory (helloapp) to the git index, and commited the changes to the local repository.

Next thing to do is creating new application on Heroku: heroku create --stack cedar from helloapp dir. This not only creates new application, but also nicely adds remote git repository. Heroku has few stacks. Stack is OS and stuff installed on it for our applications to run. For now, the only stack that supports Play is called Cedar. It's not the default one, so you need to tell Heroku explicitely that it should be used for your application.

It is also going to ask about your credentials to authenticate you on Heroku. It is done only once, and then your credentials key and token are stored on disk. If you want to delete them, just heroku auth:logout.

Ok, so you have application on Heroku, with git repository added to your remote ones, and you have one app locally which you want now to deploy to the cloud. Well, it couldn't be simplier:
git push heroku master

From now on it only takes some patience. Deployment takes time. When it's finished, it gives you the address, something like http://blooming-stone-5863.herokuapp.com deployed to Heroku in the console.

Go to this address and you'll see your app. Have fun!

Thursday, October 20, 2011

Warsjawa 2011

Dear reader. This post is about Polish event, organised by Polish programmers for Polish programmers. Speaking only Polish. So if you don't speak Polish, I don't think you'd be interested. Therefore, this post is in Polish.

W miniony weekend wybrałem się na warsztaty Warsjawa 2011. Wybrałem się z ekipą ze Szczecina jak zwykle pociągiem, co okazało się mieć taki minus, że pora roku jaka już nadeszła zapewnia że w pociągu może być albo zimno, albo gorąco. My wybraliśmy zimno. Jakoś jednak dojechaliśmy rankiem do Warszawy. Ja udałem się załatwić jeszcze parę prywatnych spraw, i nie bez drobnych komplikacji dotarłem do budynku przy Nowowiejskiej na tyle wcześnie, że mogłem jeszcze pomóc nosić ławki i krzesła.

Z czterech dostępnych ścieżek wybrałem DDD i CqRS, prowadzone przez Sławka Sobótkę i Rafała Jamroza. Warsztaty miały części prezentacyjne, i stricte warsztatowe. O ile prezentacjom niczego nie zabrakło (przynajmniej dla mnie, ale obie widziałem już wcześniej), to część warsztatowa jakoś się "rozlazła".

Z początku wstęp do DDD, ciekawy i świetnie poprowadzony. Dowiedzieliśmy się co to takiego to DDD, do czego się nadaje i z czym to się je. Po wstępie Sławek "oprowadził" nas po wcześniej przygotowanej na warsztaty aplikacji, pokazując "klocki DDD", z których jest zbudowana.

W pierwszej części warsztatowej zadaniem uczestników było rozszerzenie funkcjonalności aplikacji w duchu DDD. Zaczęliśmy prawidłowo, od testów. Z braku czasu testy pozostały na etapie wstępnym, tzn. takim, w którym wystarczyło w klasie testowanej z każdej metody zwrócić true żeby przechodziły. Więcej chyba było w tej części dyskusji, pytań i odpowiedzi niż kodowania, ale nie uważam tego za jej wadę. Wszak programowanie to przede wszystkim komunikacja. I tak czas upłynął nam do obiadu.

Na obiad była pizza, zgodnie z obietnicami organizatorów nie zabrakło :)

Po przerwie obiadowej znowu miała miejsce część prezentacyjna, w której Sławek pokazał co to takiego ten CqRS, i jakie ciekawe triki można stosować w celu poprawienia wydajności aplikacji. Np. mieć osobną bazę danych do zapisu i osobną do odczytu.

Prezentacja dość płynnie przeszła w kolejne warsztaty, które jednak chyba więcej miały z prezentacji. Nie żeby mi to przeszkadzało, może nawet tak miało być :) Dowiedzieliśmy się czegoś więcej o kilku bardziej skomplikowanych wzorcach, jak Saga czy Specification.

W ostatniej części Sławek pokazał nowe dla mnie narzędzie JBehave. Musze powiedzieć, że zrobiło na mnie wrażenie, i zamierzam poświęcić trochę czasu na bliższe poznanie tegoż. Zauważam też spore podobieństwo do Cucumbera, ciekawym czym się różnią.

Po wszystkim cała nasza ekipa czuła się pozytywnie naładowana informacjami, czuło się entuzjazm do dalszego zgłębiania poruszonych tematów, a to przecież najważniejsze. I choćby to świadczyć może o sukcesie tych warsztatów.

Jeśli miałbym szukać minusów to może za mało było napojów, no i nie było kawy. Aczkolwiek nie był do duży problem, bo w budynku były automaty zarówno z kawą, jak i z zimnymi napojami.

Thursday, January 20, 2011

First CodeRetreat in Poznań

On 15th January I had a pleasure to participate in first Code Retreat in Poznań. The event was organised by Adam Dudczak and Poznań JUG. If you don't know what Code Retreat is, take a look here. It is a great opportunity to meet other coders, see how they work and exchange knowledge and experience. There were 5 sessions, and the pairs were changing each time, so everyone coded with 5 different people.

Idea of Code Retreat is not only to code in pairs but also to use TDD. After lunch, during break, there were two discussion groups, one discussing BDD, and the other pair programming. I joined BDD group. First it was explained what BDD is, then we were discussing. The group was very active, many people had questions but there were also many answers :)

Programming task was standard for Code Retreats - Conway's Game Of Life. It's nice to watch development. During the first session we didn't finish our task, like most pairs. We barely started when the time was over. After the third session, most pairs had Game Of Life algorithm finished. Of course together with tests :)

Such an event is not only opportunity to learn, but also to meet people. Some I already knew from twitter, blogs etc., some from other events, and some were completely new to me. There was time to talk, not only during quite short breaks between sessions, but also during lunch and "afterparty". For lunch there was not pizza, but some decent dish, huge and tasty.

I have to write also about the place the event was held at. It was in Cognifide offices, and it was one of the nicest offices I've ever seen! Lunch and afterparty was in the basement, but this basement looked like a decent pub. Brick walls and ceilings, bar, comfy sofas and tables. There was also refrigerator full of beer, and it was used during afterparty :)

For me this event was a big success. Congrats, organizers!

Saturday, December 25, 2010

Scala script to find duplicate files

Here is simple Scala script finding duplicate files and moving them to another directory. It searches album-with-duplicates for duplicates of files in main-album. All duplicates found are moved to copies directory in user's home.

If you have some ideas how to improve it, I'd appreciate if you share it in comments.

MD5 algorithm taken from here.
package com.blogspot.pawelstawicki.remove.duplicates

import java.security.MessageDigest
import java.io.{FileInputStream, File}
import org.apache.commons.io.{FilenameUtils, FileUtils, IOUtils}

/**
 * @author ${user.name}
 */
object App {
  
  def main(args : Array[String]) {
    val dir1 = new File("/photos/main-album,");
    val dir2 = new File("/photos/album-with-duplicates");

    val dir1Content = getAllFiles(dir1)
    val dir2Content = getAllFiles(dir2)

    var dir1Map = Map[String, File]()
    dir1Content.foreach(f => {
      val md5 = md5SumString(IOUtils.toByteArray(new FileInputStream(f)))
      println("md5 for " + f.getPath + ": " + md5)
      dir1Map = dir1Map + (md5 -> f)
    })

    var dir2Map = Map[String, File]()
    dir2Content.foreach(f => {
      val md5 = md5SumString(IOUtils.toByteArray(new FileInputStream(f)))
      println("md5 for " + f.getPath + ": " + md5)
      dir2Map = dir2Map + (md5 -> f)
    })

    for(md51 <- dir1Map.keys; md52 <- dir2Map.keys) {

      if (md51.equals(md52)) {
        val suspectedDuplicate = dir2Map(md52)
        val original = dir1Map(md52)

        if (checkDuplicate(original, suspectedDuplicate)) {
          println(suspectedDuplicate.getPath + " is duplicate of " + original.getPath)
          val copiesDir = new File(FileUtils.getUserDirectory + "/copies/" + FilenameUtils.getPathNoEndSeparator(original.getAbsolutePath()));
          println("Moving to " + copiesDir.getPath)
          FileUtils.moveFileToDirectory(suspectedDuplicate, copiesDir, true)
        }
      }
    }
  }

  def checkDuplicate(f1: File, f2: File): Boolean = {
    val bytes1 = new Array[Byte](1024*1024)
    val bytes2 = new Array[Byte](1024*1024)

    val input1 = new FileInputStream(f1)
    val input2 = new FileInputStream(f2)

    var bytesRead1 = input1.read(bytes1)
    while(bytesRead1 > 0) {
      val bytesRead2 = input2.read(bytes2)

      if (bytesRead1 != bytesRead2) {
        return false;
      }

      //Bytes read number the same
      if (!bytes1.sameElements(bytes2)) {
        return false
      }

      bytesRead1 = input1.read(bytes1)
    }

    //bytesRead1 is -1. Check if bytes read number from file2 is also -1
    if (input2.read(bytes2) == -1) {
      return true;
    } else {
      return false;
    }
  }

  def md5SumString(bytes : Array[Byte]) : String = {
    val md5 = MessageDigest.getInstance("MD5")
    md5.reset()
    md5.update(bytes)

    md5.digest().map(0xFF & _).map { "%02x".format(_) }.foldLeft(""){_ + _}
  }

  def getAllFiles(dir : File) : List[File] = {
    var l = List[File]()
    dir.listFiles.foreach(f => {
      if (f.isFile) {
        l = f :: l
      } else {
        l = l ::: getAllFiles(f)
      }
    })

    l
  }

}

Tuesday, December 21, 2010

JSF2.0 component for cross-field validation


Have you ever had problems with cross-field validation in JSF? Me too, so I created this component. You can validate few UIInput components and have their values as List in validator. The component is in softwaremill-faces library. To use it in maven project, add repository:

<repository>
  <url>http://tools.softwaremill.pl/nexus/content/groups/smlcommon-repos/ </url>
  <layout>default</layout>
  <releases>
    <enabled>true</enabled>
  </releases>
  <snapshots>
    <enabled>true</enabled>
  </snapshots>
</repository>
and dependency:
<dependency>
  <groupId>pl.softwaremill.common</groupId>
  <artifactId>softwaremill-faces</artifactId>
  <version>43-SNAPSHOT</version>
</dependency>
Now you can use multiValidator component. First add namespace to your .xhtml page:
xmlns:v="http://pl.softwaremill.common.faces/components"

Then just wrap components you want to cross-validate in <v:multiValidator>. If you attach validator to this component, value parameter that goes to validation method is List of values of UIInput components inside  tag.

E.g. if you want to validate two checkboxes. Each can be checked or unchecked, but at least one has to be checked.
<v:multiValidator id="multi" validator="#{bean.validationMethod}">
  <h:selectBooleanCheckbox value="#{bean.check1}" />
  <h:selectBooleanCheckbox value="#{bean.check2}" />
</v:multiValidator>
<h:message for="multi" />
Validation method in bean:
public void validationMethod(FacesContext context, UIComponent component, Object value) {
  List<Object> values = (List<Object>) value;
  //value is list of values of both selectBooleanCheckboxes
  Boolean firstChecked = (Boolean) values.get(0);
  Boolean secondChecked = (Boolean) values.get(1);

  if (! (firstChecked || secondChecked)) {
    Message message = new FacesMessage(FacesMessage.SEVERITY_ERROR, "Check at least one checkbox", null);
    throw new ValidatorException(message);
  }
}
If none checkbox is checked error message is displayed in <h:message for="multi"> tag.

Source code of this component is on github.

Any suggestions, opinions or questions regarding this component are welcome. Have a good time using it :)

Tuesday, November 2, 2010

GWT table row as UiBinder

Some time ago I wanted to dynamically add rows to a table in GWT, but I wanted to define row template using UiBinder. Programatically it is no problem. You can create FlexTable and add widgets to it. The problem arises when you want to do it using UiBinder. You can create a FlexTable in UiBinder, and you can create widgets, but you can't create element which renders to html tag <tr>. Kazik Pogoda found a way to do it.

First we need two widgets which renter to <tr> and <td>. The code for TR:
public class TrElement extends ComplexPanel {
  private TableRowElement tr;

  public TrElement() {
    Document doc = Document.get();
    tr = doc.createTRElement();
    setElement(tr);
  }

  @Override
  public void add(Widget child) {
    add(child, (Element) tr.cast());
  }
}
The TD is analogous, just change TableRowElement into TableCellElement and doc.createTRElement() into doc.createTDElement(). We can now create UiBinder xml file which renders to single table row (TR element is it's root):
<!DOCTYPE ui:UiBinder SYSTEM "http://dl.google.com/gwt/DTD/xhtml.ent">
<ui:UiBinder xmlns:ui="urn:ui:com.google.gwt.uibinder"
      xmlns:g="urn:import:com.google.gwt.user.client.ui"
      xmlns:my="urn:import:pl.my.gwt.client">
 
  <my:TrElement>
    <my:TdElement>
      <g:HTMLPanel>
        <g:Label ui:field="icon" styleName="Icon"></g:Label>
        <g:Label ui:field="title" styleName="Title"></g:Label>
        <g:Label ui:field="description" styleName="Description"></g:Label>
      </g:HTMLPanel>
    </my:TdElement>
    <my:TdElement>
      <g:Label ui:field="price" styleName="Price"></g:Label>
    </my:TdElement>
  </my:TrElement>
</ui:UiBinder>
Here is how we can use it to add to a table (FlexTable):
TableRowView trView = new TableRowView();
table.getElement().appendChild(trView.getElement());

Saturday, October 30, 2010

Warsjawa 2010. Impressions.

My impressions after this year's Warsjawa are very positive. Well, in fact I could expect this :) Presentations were interesting, meeting other IT people is always good too. I met Bartek Zdanowski, who wanted to meet me. It's quite strange feeling when you meet somebody who knows you, but didn't meet you before. Strange but nice :)

First presentation was about Play framework by Wojciech Erbetowski. I was a little late, but I've seen enough to notice that Play is framework different than all the others.

I was a bit disappointed that Sławek Sobótka didn't make it there (he fell ill). He's topic was the most interesting for me. However, Paweł Lipiński worthily replaced him. Paweł was talking about what in programming he was taught by... his own children, kindergarten, Roomba etc. I never noticed that when there are 2-3 people in a project, it is much cleaner, but it's becoming a mess when there are more than 5 people. I never noticed it, but now it's very clear to me. It seems Paweł is a man who can learn and get knowledge from anything. Ah, and he mentioned me :)

This year on Warsjawa there was also something from our Szczecin JUG. Darek "Lock" Łuksza presented Git version control system and it's Eclipse plugin EGit. Darek did great job, and even found one bug during presentation :) It seemed a bit embarassing for him, but the rest was very good. He knows the topic very well (he's EGit commiter) and he showed many things coding live. Overall presentation was very good.

After Darek's presentation pizza arrived. It disappeared quite quickly, maybe there was a bit too few. We run out of beverages too. Anyway I didn't hear somebody died of hunger or thirst, so it wasn't that bad :)

Next interesting presentation was about Clojure. This time there were two presenters. First Marcin Rzewucki showed us some theory, then Jan Rychter told about practical use of Clojure in Fablo. He showed few interesting features of this language, like STM. Thanks to STM in Fablo they are able to replace customer's database without stopping the service. Pretty impressive.

Did you know that in Java you can have two methods with the same name and arguments, differing only by return type? Compiler can't compile this, but if you write it in bytecode it is perfectly valid! This and others interesting things about bytecode were shown by Adam Michalik. I wonder if any company needs "bytecode programmer"? I like such low-level stuff. At the university I always liked assembler.

The last presentation by Rafał Rusin was about Apache HISE. I have to admit I was too tired and the topic was not very interesting for me, so I didn't remember much from this one.

Generally I think this was very nice conference. Meeting new people, and some older friends, is always nice. Listening to interesting people talking about interesting things is also nice. It seems one hour for presentation is very good duration. All the presenters could do all they wanted/needed (at least it seemed so). I remember on GeeCON there was only 45 minutes and it was too little. If only there was more pizza (or maybe something better?) and beverages it would be perfect.

Wednesday, October 13, 2010

Convert JME application to Android

Here is the story:

I bought Android phone. Earlier I was using Windows Mobile phone, and I had one j2me application on it that was very important to me. It was "TokenGSM", application which serves the same purpose as RSA tokens, but installed on my phone. Very good decision of my bank that they created it so users don't have to carry additional device with them (users have choice, you can also get RSA token if you prefer it). So this application is necessary if I want to log in to my bank account. Pretty vital.

But, as you probably know, there is no Java ME on Android :( Here is what I did (this forum was useful):


  1. Call the bank and ask for new GSM token. Token is somehow bound to the phone, so if you change phone, you need new token.
  2. Write down URL from WAP Push SMS. Do it before opening it. On my phone (Android 2.2, HTC Desire) if you don't do it but just try to open URL, it's lost. Browser can't open it, but you don't even have chance to see it. Browser just blinks and returns to home screen :| It's not in history, nor in downloads.
  3. Go to http://www.netmite.com/android/ and download App Runner. I went there from my phone and downloaded directly to it. I'm not sure if this point is really necessary, but some say it is.
  4. Click "Convert existing j2mes into apk & upload to Android Market." I don't think it really uploads to Market.
  5. Enter your written down URL and click "Get Apk". You have your Android TokenGSM :)
  6. Transfer the file to your phone and install it.
  7. Now you have to activate the token with code you received from the bank.

Sunday, September 26, 2010

Flash scope in JSF 2.0 (nothing about Adobe Flash)

In JSF 2.0, amongst Request, Session etc, there is the new scope called Flash. (However there is no annotation @FlashScope, and you can't put bean in this scope). It's concept is taken from Ruby on Rails. Data in Flash scope are available for current and for next request, but not for subsequent requests. Usage is very simple.
On first page (e.g. index.html):
<h:form>
  <h:inputtext value="#{flash.text}">
  <h:commandbutton action="page?faces-redirect=true" value="To page">
</h:form>
And this is the page we are redirecting to, page.xhtml:
<h:form>
  <h:outputtext value="#{flash.text}">
</h:form>
Why would you need such scope? Imagine you want to enter data on one page, then redirect to another page, and display this data. If not for redirect, we could use Request scope. But with redirect value is sent with request, then browser is redirected to another page, and makes another request. Request scoped value is gone. In such case Flash scope becomes useful. We can put value in this scope with one request, and when another request is made, the value is still there. But it is not stored in session, and is not available for subsequent requests.

However, there is a way to make data in Flash scope alive a bit longer. It is enough if in page.xhtml we change #{flash.text} to #{flash.keep.text}. This way data is not removed from the scope after first request, but is available for one more.

In managed beans, you can get flash scope by
Flash flash = FacesContext.getCurrentInstance().getExternalContext().getFlash();